Guidelines for new Themes – Customizer-Friendly Theme Settings in WhiteLabelPress (WLP): A Developer’s Guide
January 3, 2025
In WhiteLabelPress (WLP), we’ve taken the classic Customizer API to the next level, making it a central tool for site building—no other plugins required. As part of our goal to provide a powerful, seamless site-building experience, we’ve enhanced the Customizer to allow developers to create custom theme settings that are easy to use and visually intuitive for end users. This guide shows you how to create a Customizer-friendly Theme Settings panel with a dedicated Site Identity subsection where users can upload and manage a custom header logo.
What Are Customizer-Friendly Theme Settings?
Customizer-friendly theme settings allow you to bundle all theme-specific options into an intuitive interface that users can easily navigate. These settings are integrated into WLP’s enhanced Customizer API, allowing developers to manage everything from branding to layout without needing additional plugins or tools. With this approach, your theme’s customization options are centralized, making the site-building process simple and cohesive.
Step-by-Step Implementation
Let’s create a Theme Settings panel in WLP’s Customizer, complete with a Site Identity subsection for uploading a custom header logo.
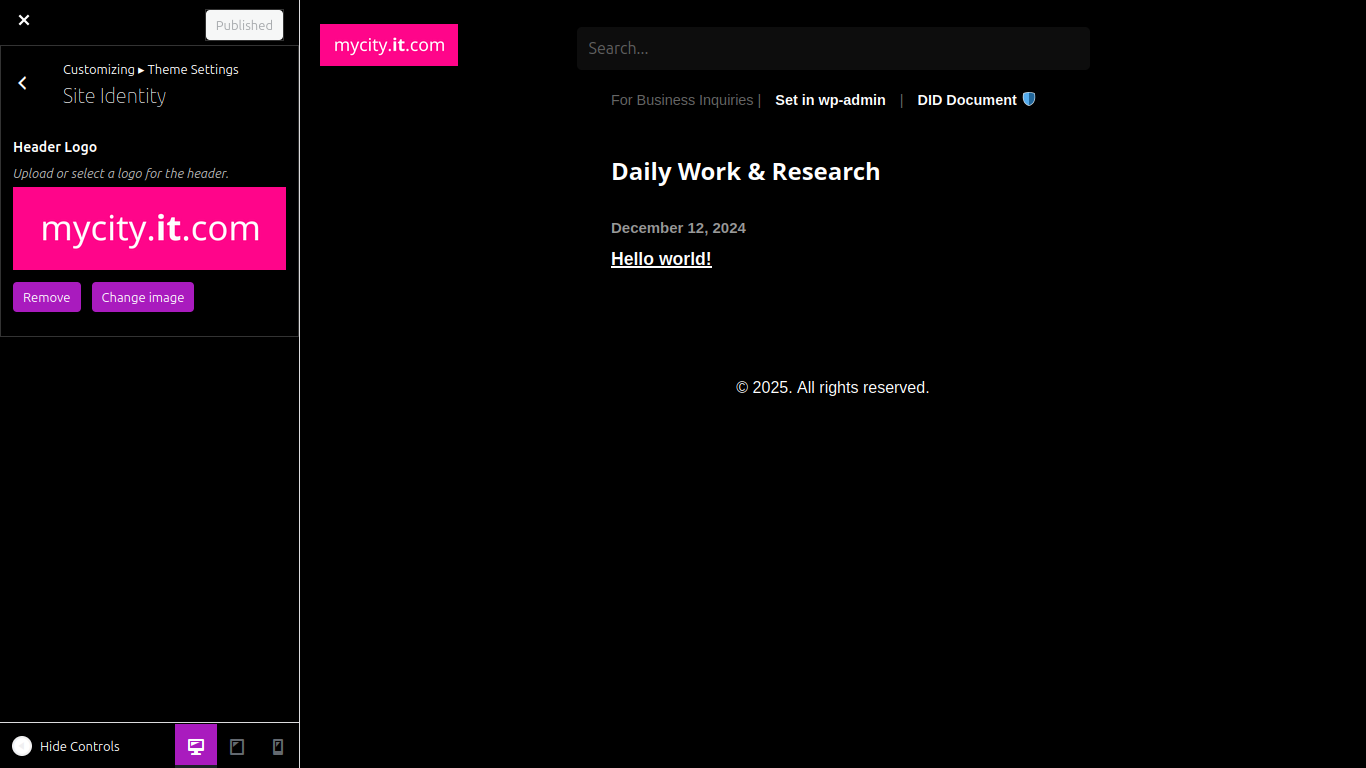
1. Define the Theme Settings Panel
Start by creating the Theme Settings panel, which will serve as a container for all your theme-specific settings:
function wlp_customize_register( $wp_customize ) {
    // Create the "Theme Settings" panel.
    $wp_customize->add_panel( 'wlp_theme_settings_panel', array(
        'title'       => __( 'Theme Settings', 'wlp' ),
        'description' => __( 'Manage your theme-specific settings, including branding and layout.', 'wlp' ),
        'priority'    => 10,
    ) );

    // Add a "Site Identity" section within this panel.
    $wp_customize->add_section( 'wlp_site_identity_section', array(
        'title'    => __( 'Site Identity', 'wlp' ),
        'panel'    => 'wlp_theme_settings_panel',
        'priority' => 10,
    ) );

    // Add a setting for the custom header logo.
    $wp_customize->add_setting( 'wlp_header_logo', array(
        'default'           => '',
        'sanitize_callback' => 'esc_url_raw',
        'capability'        => 'edit_theme_options',
    ) );

    // Add a control for uploading the header logo.
    $wp_customize->add_control( new WP_Customize_Image_Control( $wp_customize, 'wlp_header_logo', array(
        'label'       => __( 'Header Logo', 'wlp' ),
        'section'     => 'wlp_site_identity_section',
        'settings'    => 'wlp_header_logo',
        'description' => __( 'Upload or select a logo for your site header.', 'wlp' ),
    ) ) );
}
add_action( 'customize_register', 'wlp_customize_register' );
2. Display the Header Logo in Your Theme
To make the logo display on the front end of the site, add the following code to your theme’s header.php file:
<?php if ( get_theme_mod( 'wlp_header_logo' ) ) : ?>
    <div class="site-header-logo">
        <a href="<?php echo esc_url( home_url( '/' ) ); ?>">
            <img src="<?php echo esc_url( get_theme_mod( 'wlp_header_logo' ) ); ?>" alt="<?php bloginfo( 'name' ); ?>">
        </a>
    </div>
<?php else : ?>
    <h1 class="site-title">
        <a href="<?php echo esc_url( home_url( '/' ) ); ?>"><?php bloginfo( 'name' ); ?></a>
    </h1>
<?php endif; ?>
Why This is the Best Approach
-
Clear and Intuitive Organization
- Grouping all theme options under a single Theme Settings panel makes it easy for users to find and manage customization features. The Site Identity subsection is specifically dedicated to site branding, such as the header logo, making it incredibly intuitive for non-technical users.
-
No Additional Plugins Needed
- One of the defining features of WLP is our enhanced Customizer API. It eliminates the need for additional plugins, providing all the necessary tools to build and customize a site directly through the Customizer. This approach streamlines the development process, keeping everything native to the platform.
-
User-Focused Experience
- With the new organization structure, users can focus on customizing the branding of their site without getting distracted by irrelevant options. The Theme Settings panel offers a centralized location for all theme-specific settings, ensuring a smooth and streamlined experience.
-
Scalable and Flexible Design
- As your theme evolves, you can continue adding new sections (e.g., typography settings, layout controls) to the Theme Settings panel without cluttering the Customizer. The modular nature of this system ensures that new features integrate seamlessly.
-
Customization at Its Core
- The Customizer-friendly theme settings approach puts the power in the hands of the user, giving them full control over their website’s appearance without the need for complex tools. It’s part of WLP’s vision to make site-building a simple, unified experience without relying on multiple plugins or third-party extensions.
Final Thoughts
By creating a Customizer-friendly Theme Settings panel with WhiteLabelPress (WLP), you’re providing an intuitive, centralized, and powerful customization experience. This method helps organize theme settings in a way that’s user-friendly and easy to navigate.
What makes this approach stand out is WLP’s enhanced Customizer API—a built-in feature that centralizes customization, meaning developers and users alike don’t need to rely on external plugins. This is part of our broader goal of making site-building easier, faster, and more flexible for everyone. Whether you’re working on a simple blog or a complex business site, WLP’s approach to theme settings ensures a smooth, scalable experience.
Let us know how you’re using these settings in your theme or if you need further customization tips to make your project truly stand out!

Neil
Lead dev @ WLP (WhiteLabelPress)